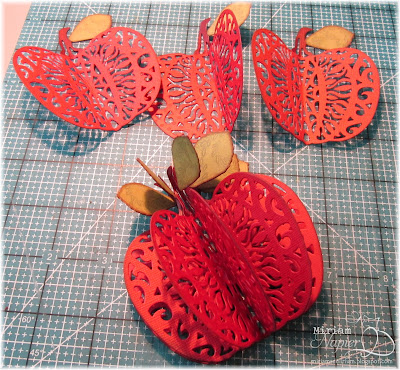
Serendipity Stamps has started a Blog Challenge for stampers and customers! Our first challenge is the Honeycomb technique. Don't know this technique? I've done a tutorial below.
We'd love for you to play along with our challenge! We just ask that you use at least one Serendipity image or die. One winner will receive our new Winner Badge to proudly display on their blog. And, there will be a random winner who will receive $20 off your next order at Serendipity Stamps. HERE is where you can link up your creation.
Serendipity's sale of the week is Free Shipping within the Continental US on all orders $10 and up from Dec 5-12, 2012.
Please welcome our new DT member Marybeth!
Check out what the rest of the Design Team created:
Check out what the rest of the Design Team created:
Here is my Apple Honeycomb tutorial.
You can use a minimum of 3 or as many as you want. It doesn't have to be an odd or even number. I like the fullness of 9 so I have die cut 9 apples out of different shades of red cardstock. I wanted to punch out some leaves but didn't have the right size in a punch. So, I used a single leaf from the Spellbinders Foliage set. The branch leaves turned out to be too small.
I trimmed off the very end of the coil (left). I left the 2 loops to have something to glue the leaves to. I trimmed off the very pointed end of the leaves and inked the edges. Then I glued the leaf to the coil, front and back.
Next I scored each one down the middle. This technique only works with symetrical dies and punches which this one is. I didn't score the stems.
Here are all nine scored, folded and edges inked.
One half of each side is glued to another, back to back. Here are 2 glued together.
Keep adding them until all are glued together. This picture shows 6 glued together. If you want you can stop here and glue your apple to a card or project.
Done! Too many leaves? Maybe I'll snip some off.
- Stamps: None!
- Ink: Color Box - Chestnut Roan chalk ink
- Paper: various red cardstocks: Bazzill, Stampin' UP!, misc green DSP
- Copic: E29


6 comments:
What a wonderful project, and great tutorial! Such a fun idea. Love the detail in the die. Thanks for the warm welcome,Mariam.
This is gorgeous Miriam, and I love the tutorial you provided too!
Great tutorial Miriam...I bet you help a lot of people learn how to do this technique...love you made the pumpkin into an apple and you did such a great job lining up the intricate die.
This is so pretty and I love the tutorial - you made it look easy and I'm ready to try it again with a fancy cut die! This would be so pretty decorating the table... or maybe on teachers desk?
Great idea to add the little leaf, gives it more of an apple feel for sure! Good tutorial pics!
Fantastic tutorial and beautiful apple you created with that pumpkin die. Love the little leaves too!
Post a Comment